
DSM Online Support
Support Master
Welcome to DSM Online
How can I help you today
How can we assist you? please let us know the support you need from DSM Online
Introduction:
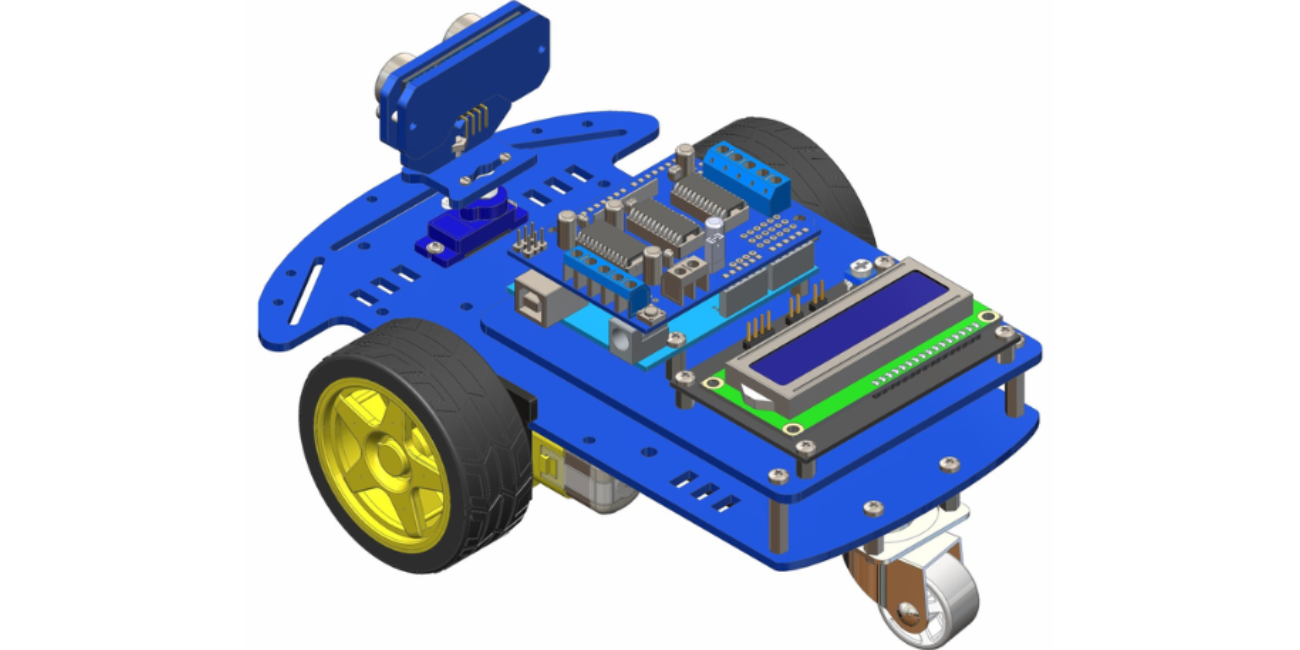
Remote-controlled cars have always been a popular hobby, but what if you could add a layer of intelligence and functionality to them? This blog post will guide you through building a remote ultrasonic ranging car equipped with an LCD display. This project combines the fun of remote control with the practical application of ultrasonic distance measurement, allowing the car to "sense" its surroundings and display the distance to obstacles in real-time. This is a fantastic project for electronics enthusiasts, hobbyists, and anyone interested in learning about robotics and sensor integration.
Components Required:
Working Principle:
The ultrasonic sensor works by emitting a short burst of sound waves and measuring the time it takes for the echo to return after bouncing off an object. This time is then used to calculate the distance to the object. The Arduino reads this distance value and displays it on the LCD screen. The remote control allows the user to steer the car and control its speed.
Circuit Diagram and Connections:
Ultrasonic Sensor: Connect the VCC pin of the HC-SR04 to 5V on the Arduino, GND to GND, Trigger pin to a digital pin on the Arduino (e.g., pin 7), and Echo pin to another digital pin (e.g., pin 6).
Servo Motor: Connect the servo motor's power and ground pins to 5V and GND on the Arduino, respectively. Connect the signal wire of the servo to a PWM pin on the Arduino (e.g., pin 9).
LCD Display: Connect the LCD's VCC and GND to 5V and GND on the Arduino. Connect the data pins (D4-D7) of the LCD to digital pins on the Arduino (e.g., pins 2-5). Connect the RS pin to another digital pin (e.g., pin 12) and the Enable pin to a digital pin (e.g., pin 11). You may need a potentiometer to control the LCD contrast.
Remote Control Module: Connect the transmitter module's power and ground to the power source. Connect the data pin to an analog pin of the Arduino. Connect the receiver module's power and ground to the power source. Connect the data pin to an analog pin of the Arduino.
Motor Driver (If Required): Depending on the motors you are using, you might need a motor driver IC (like an L298N) to control the motors. Connect the motor driver as per its datasheet.
Assembly and Testing:
Once the circuit is connected and the code is uploaded to the Arduino, assemble the car. Power on the circuit and use the remote control to control the car's movement. Observe the LCD display to see the real-time distance readings.
Further Enhancements:
Conclusion:
This project provides a hands-on learning experience in robotics, sensor integration, and programming. By building this remote ultrasonic ranging car, you can gain a deeper understanding of how these technologies work together. This is a great starting point for more complex robotics projects and opens up possibilities for various applications. Remember to adapt the code and circuit based on your specific components and requirements. Have fun building!

